How to Paint Render and Brick Exteriors
A Guide to Prepping and Painting Masonry Surfaces
Painting a rendered or brick home is one of the most dramatic ways to modernise its appearance and boost its street appeal. A fresh, contemporary colour can transform a dated brick facade or a tired, stained render into a stunning modern exterior. However, masonry surfaces like render and brick are very different from weatherboards. They are porous, textured, and can hold onto moisture and fine dust. Proper preparation and using the right type of paint are absolutely crucial for a finish that not only looks great but also lasts in the tough Australian climate.
Phase 1: The All-Important Cleaning and Prep
Masonry surfaces are magnets for dirt, pollution, and efflorescence (those chalky white salt deposits). You cannot paint over this contamination.
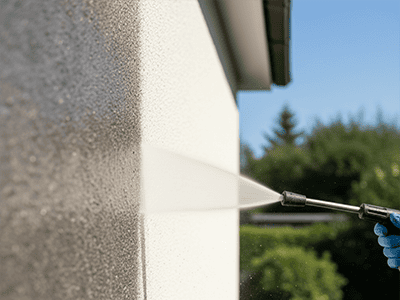
- High-Pressure Clean: The most effective way to prepare brick or render is with a high-pressure washer. This will blast away years of built-up grime, cobwebs, loose sand, and any powdery, failing paint. Start with a wide nozzle and work from the top down.
- Treat Mould and Stains: If you have any areas with mould or dark mildew stains (common on shaded walls), treat them with a specialised exterior mould killer after the pressure wash.
- Address Efflorescence: If you see any white, chalky residue on your brick or render, this is efflorescence. It must be removed completely by scrubbing with a stiff-bristled brush and rinsing thoroughly. If you paint over it, the salts will simply push your new paint off the wall.
- Repair Cracks: Carefully inspect the entire surface for cracks. For fine hairline cracks, a flexible exterior gap filler is suitable. For larger, more significant cracks in the render, you will need to use a dedicated masonry repair compound.
- Allow to Dry Completely: This is a vital step that cannot be rushed. A rendered or brick wall can hold a surprising amount of water. You must wait at least 2-3 full, dry, sunny days after pressure washing before you can even think about priming. Painting over a damp wall is a guarantee of failure, as the trapped moisture will cause the new paint to bubble and peel.
Phase 2: Priming and Sealing the Surface
Because masonry is so porous, priming (or sealing) is non-negotiable. This step seals the surface, stops the wall from sucking up all your expensive topcoat, and ensures a strong bond.
- Choose a Masonry Primer: You must use a primer specifically designed for brick and render. These are often called "masonry primers" or "render sealers". They are formulated to penetrate the porous surface and bind any remaining chalky residue.
- Apply a Full, Generous Coat: Using a roller with a long nap (20-27mm), apply one full, generous coat of your masonry primer to the entire surface. Ensure you work it into the texture of the render or the mortar joints of the brick.
Phase 3: Applying Your Topcoats
Now that your surface is sealed and stable, you're ready for your colour. Always choose a premium 100% acrylic exterior paint that is designed for weather resistance and UV protection, such as Dulux Weathershield.
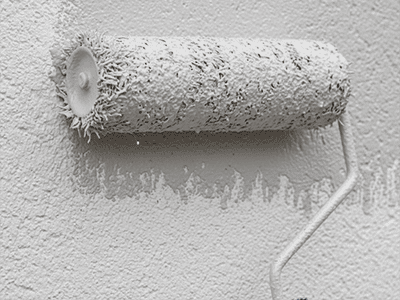
- Use a Thick-Nap Roller: A long-nap (or "thick-nap") roller cover is essential. The longer fibres will hold more paint and effectively get into all the pits and textures of the render or brick surface, preventing "holidays" (missed spots). -
- Work in Sections: Tackle the wall in manageable one-metre-square sections. Use the "W" technique to apply the paint, and then lay it off with parallel strokes to ensure even coverage.
- Apply Two Full Coats: For the best colour depth and long-term durability, two full topcoats are required. Allow the first coat to dry completely as per the manufacturer's instructions before starting the second.
Pro Tip from a Sydney Painter
The biggest challenge with render and brick is ensuring the surface is completely clean, stable, and bone dry before painting begins. Trapped moisture is the number one enemy. As professionals, we use moisture meters to test the wall's dryness before proceeding. For the most efficient and uniform finish, especially on highly textured surfaces, we use professional airless sprayers. This technique forces the paint into every tiny crevice, providing a superior bond and a flawless, even finish. If you want to transform your brick or rendered home, trust the experts at DRJ Painting to do it right.